

BEGINNER GEOMETRY • PRACTICAL MEASUREMENT GUIDE
A diameter is the straight-line distance across a circle through its exact center. This guide shows you how to identify it, measure it with ordinary and precision tools, calculate it from radius or circumference, and avoid the small mistakes that can double or distort an answer.
Author: RevisionTown Team | Reviewer: RevisionTown Team | Published: August 24, 2026 | Updated: August 24, 2026
The Short Answer
The diameter of a circle is a line segment that joins two points on the circle and passes through the center. Its length is twice the radius, so d = 2r. To measure a flat circular object, place a ruler across its widest point and adjust the ruler until it passes through the center; the edge-to-edge reading is the diameter.
If the center is difficult to locate, measure the circumference with a flexible tape or string and calculate d = C ÷ π. For a pipe, ring, bolt, or other object that needs a more precise result, use the appropriate jaws of a caliper and distinguish carefully between outside diameter and inside diameter.
Diameter at a Glance
| Question | Beginner-friendly answer |
|---|---|
| What is diameter? | The distance across a circle through its center |
| How is it related to radius? | Diameter is twice the radius: d = 2r |
| How is it related to circumference? | C = πd, so d = C ÷ π |
| Best simple tool | A ruler or straight measuring tape for a flat circle |
| Best precision tool | A vernier, dial, or digital caliper |
| Main measuring rule | Measure the maximum edge-to-edge width through the center |
| Units | Any length unit, such as mm, cm, m, in, or ft |
What Is a Diameter?
A diameter is a straight line segment from one point on a circle to another point on the circle that passes through the center. The word can describe both the segment drawn across the circle and the numerical length of that segment. For example, you might draw a diameter on a diagram, or say that a plate has a diameter of 26 centimetres.
Every circle has infinitely many possible diameters. You can rotate the segment to any angle as long as it still passes through the center and both ends touch the circle. In a perfect circle, all of those diameters have the same length. This is why the diameter is a reliable way to describe the circle’s overall size.
The center condition is essential. A segment that connects two points on the circle but misses the center is a chord, not a diameter. A diameter is therefore a special chord—the longest chord a circle can have. As a chord moves away from the center, it becomes shorter.
The standard variable for diameter is usually d, although technical drawings may use the diameter symbol ⌀ before a measurement. For example, “⌀ 20 mm” means a diameter of 20 millimetres. The symbol is helpful on engineering drawings because it tells the reader that the number describes a circular feature rather than an ordinary straight length.
The mathematical definition applies to an ideal two-dimensional circle. In daily life, people also speak about the diameter of three-dimensional round objects. A ball’s diameter is the straight distance through the center from one side of the spherical surface to the other. A cylinder has a diameter across either circular end. A pipe may have both an outside diameter and an inside diameter because its wall has thickness.
OpenStax defines a diameter as a segment passing through a circle’s center and connecting two points on the circle. It also states that the diameter is twice the radius. That simple relationship is the foundation for nearly every beginner calculation involving diameter.
Diameter vs Radius, Chord, Circumference, and Area
The diameter measures across the circle; the radius measures from the center to the edge; the circumference measures around the edge; and area measures the enclosed surface. These quantities are connected, but they answer different questions.
| Circle feature | Meaning | Relationship to diameter | Type of unit |
|---|---|---|---|
| Radius (r) | Center to any point on the circle | r = d ÷ 2 | Length |
| Diameter (d) | Across the circle through the center | d = 2r | Length |
| Chord | Joins any two points on the circle | The diameter is the longest chord | Length |
| Circumference (C) | Distance around the circle | C = πd | Length |
| Area (A) | Space enclosed by the circle | A = πd² ÷ 4 | Square units |
A common beginner error is to confuse diameter with radius. Imagine a bicycle wheel. The radius begins at the hub and ends at the rim. The diameter goes from one side of the rim to the opposite side through the hub. It contains two radii placed end to end, which explains the formula d = 2r.
Circumference is different because it follows the curved boundary. If you wrap a tape around a jar lid, you are measuring circumference. If you lay a ruler straight across the lid through its center, you are measuring diameter. The constant π connects the two: the circumference of every ideal circle is π times its diameter.
Area requires square units because it measures a surface rather than a distance. If a circle’s diameter is 10 cm, its radius is 5 cm, so its area is π × 5² = 25π cm², approximately 78.54 cm². Writing 78.54 cm would be incorrect because that is a length unit, not an area unit.
When reading a question, underline the quantity you have and circle the quantity you need. This tiny habit prevents most formula mix-ups. If you are given circumference and need diameter, rearrange C = πd to get d = C ÷ π. If you are given area, first find the radius with r = √(A ÷ π), then double it.
How to Measure Diameter With a Ruler
Place the zero mark at one edge, run the ruler straight across the center, and read the opposite edge. The ruler must cross the widest part of the circle. If it is above or below the center, you are measuring a shorter chord.
Step 1: Choose a suitable ruler
Use a ruler longer than the object’s expected diameter. A rigid ruler is easier than a soft tape for a flat lid, coin, coaster, washer, or plate because it stays straight. Choose millimetres when you need a finer reading and centimetres or inches when an approximate household measurement is sufficient.
Step 2: Start at a real scale mark
Align the object’s edge with the ruler’s zero line, not automatically with the physical end of the ruler. On some rulers, the printed zero begins a few millimetres inward. If the ruler’s end is worn or damaged, start at another clear mark—such as 1 cm—and subtract the starting reading from the ending reading.
Step 3: Find the widest reading
Slide the ruler slowly up and down while keeping it parallel to the tabletop. The reading grows as the ruler approaches the center and becomes smaller after it passes the center. The largest stable edge-to-edge reading is the diameter. This “maximum-width” method is useful when the center is not marked.
Step 4: Read at eye level
Look straight down at the scale. Viewing from an angle causes parallax: the object’s edge appears to line up with a different tick mark. For a thick object, place it on a level surface and keep the ruler close to the widest cross-section you intend to measure.
Step 5: Record the unit and sensible precision
Write the value with its unit, such as 84 mm or 8.4 cm. Do not report more decimal places than the tool supports. A ruler marked every millimetre might justify a result close to the nearest millimetre; it does not justify a claim such as 84.003 mm.
Quick check: Measure again after rotating the object or ruler by about 90 degrees. A perfect circle should give the same diameter. Different readings may mean the object is oval, damaged, tilted, or being measured at different heights.
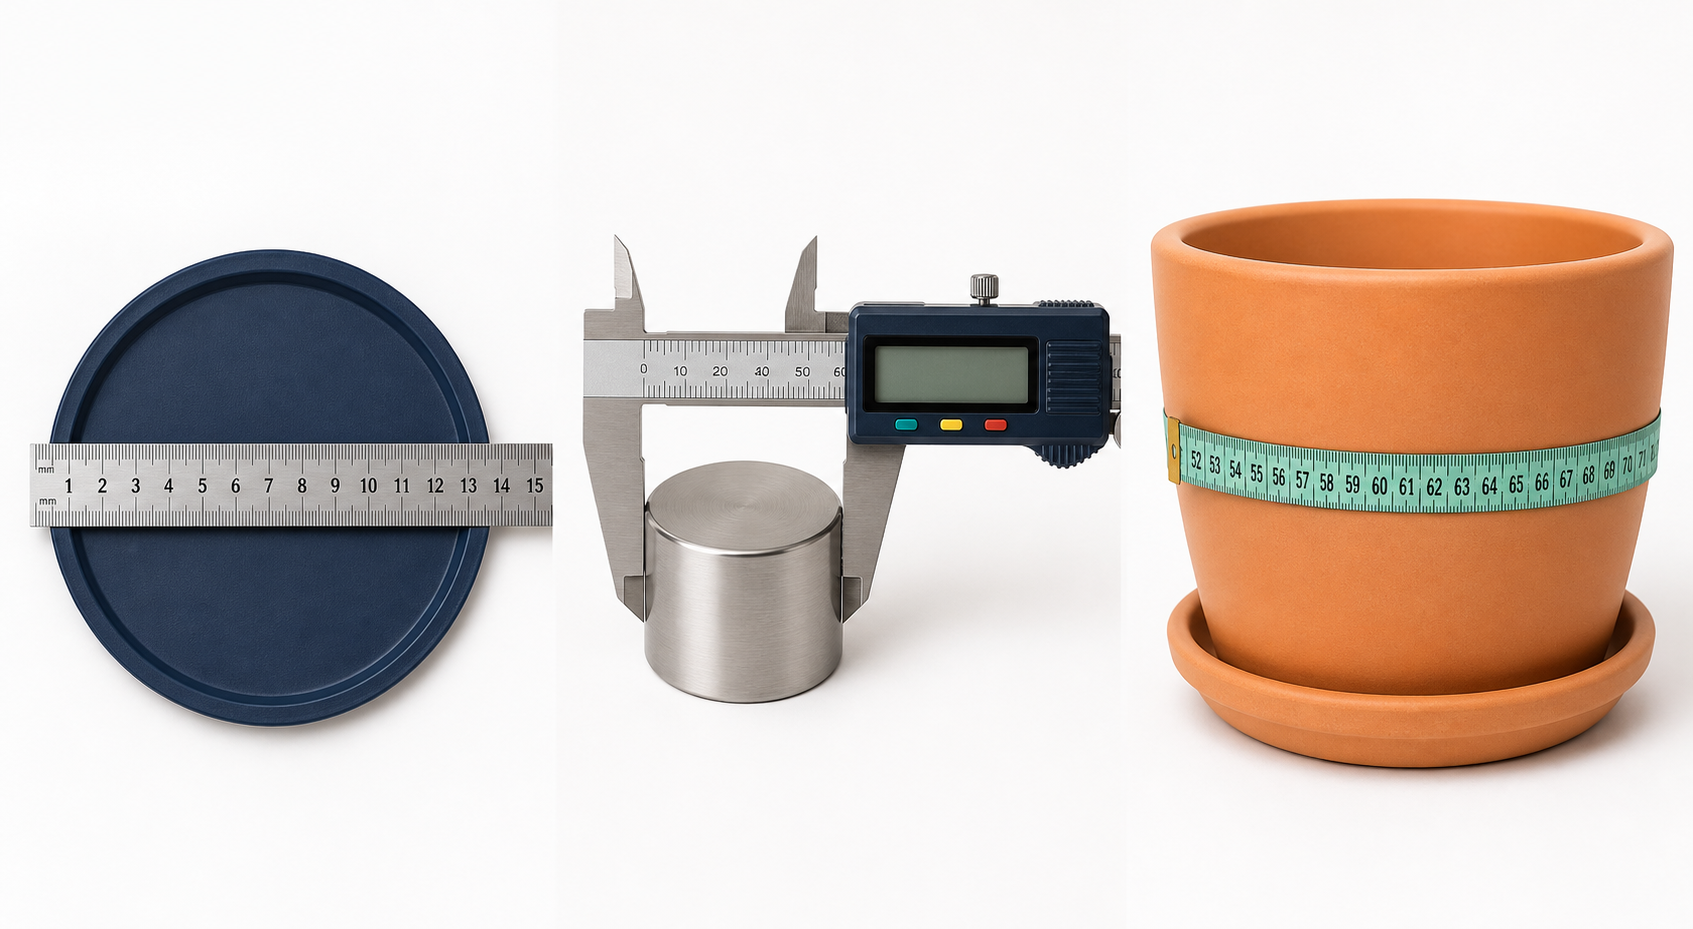
Four Ways to Measure Diameter When a Simple Ruler Is Not Enough
The best method depends on the object’s size, shape, accessibility, and required precision. A dinner plate and a tiny machine pin are both circular, but they should not be measured with the same tool.
Method 1: Use two straight edges
For a large round object, place it between two parallel straight edges—such as two books, two blocks, or the jaws of a large square. Keep the straight edges tangent to opposite sides and measure the perpendicular gap between them. That gap is the outside diameter.
This method avoids guessing the center. It is especially useful for a ball, pot, bucket, rolled cable, or object whose curved surface makes it hard to hold a ruler across the true widest point. The two edges must remain parallel; if they form an angle, the gap will not represent the diameter accurately.
Method 2: Measure circumference and divide by π
Wrap a flexible tape around the object once, keeping the tape level and snug without stretching it. Record the circumference C, then calculate d = C ÷ π. If you do not have a flexible tape, wrap non-stretch string around the object, mark the overlap, straighten the string, and measure its length.
For example, if a plant pot has a circumference of 94.2 cm, its estimated diameter is 94.2 ÷ π ≈ 29.98 cm, which is approximately 30.0 cm. This method is convenient for tree trunks, columns, jars, tanks, and other objects whose opposite edges cannot be reached easily.
The result depends on the tape path. A tilted wrap follows a longer diagonal path and overestimates the circumference. Thick string also follows a path slightly outside the true surface, so use thin non-stretch material for a better estimate.
Method 3: Use a caliper
A vernier, dial, or digital caliper measures the distance between two jaws. Use the larger outside jaws for an outside diameter and the smaller upper jaws for an inside diameter. Close the jaws lightly until both measuring faces touch the object. Keep the caliper square to the feature rather than tilted.
Before measuring, close the jaws and check that the tool reads zero. Wipe dust from the jaws and object because a small particle can matter when measuring to tenths or hundredths of a millimetre. Apply light, consistent force; squeezing soft plastic, foam, rubber, or thin tubing changes the dimension you are trying to measure.
The UK National Physical Laboratory notes that calliper and micrometer results can be affected by measurement force, temperature, wear, instrument choice, and handling. For classroom or household work, that means a clean tool, gentle contact, correct alignment, and repeat measurements matter more than simply buying a display with many digits.
Method 4: Trace and construct the center
Place a flat circular object on paper and trace its boundary. Draw two different chords. Construct the perpendicular bisector of each chord; their intersection identifies the center. Now draw a straight line through the center until it reaches both sides of the traced circle. Measure that segment to obtain the diameter.
This geometry method is slower, but it makes the definition visible and works well in lessons. It also helps when the object has a hole, raised center, or other feature that prevents a ruler from lying flat across it.
Outside Diameter, Inside Diameter, and Nominal Diameter
Outside diameter (OD) measures the full exterior width; inside diameter (ID) measures the opening; nominal diameter is a standardized name that may not equal either physical measurement exactly. The distinction matters for pipes, tubes, rings, bearings, washers, and containers.
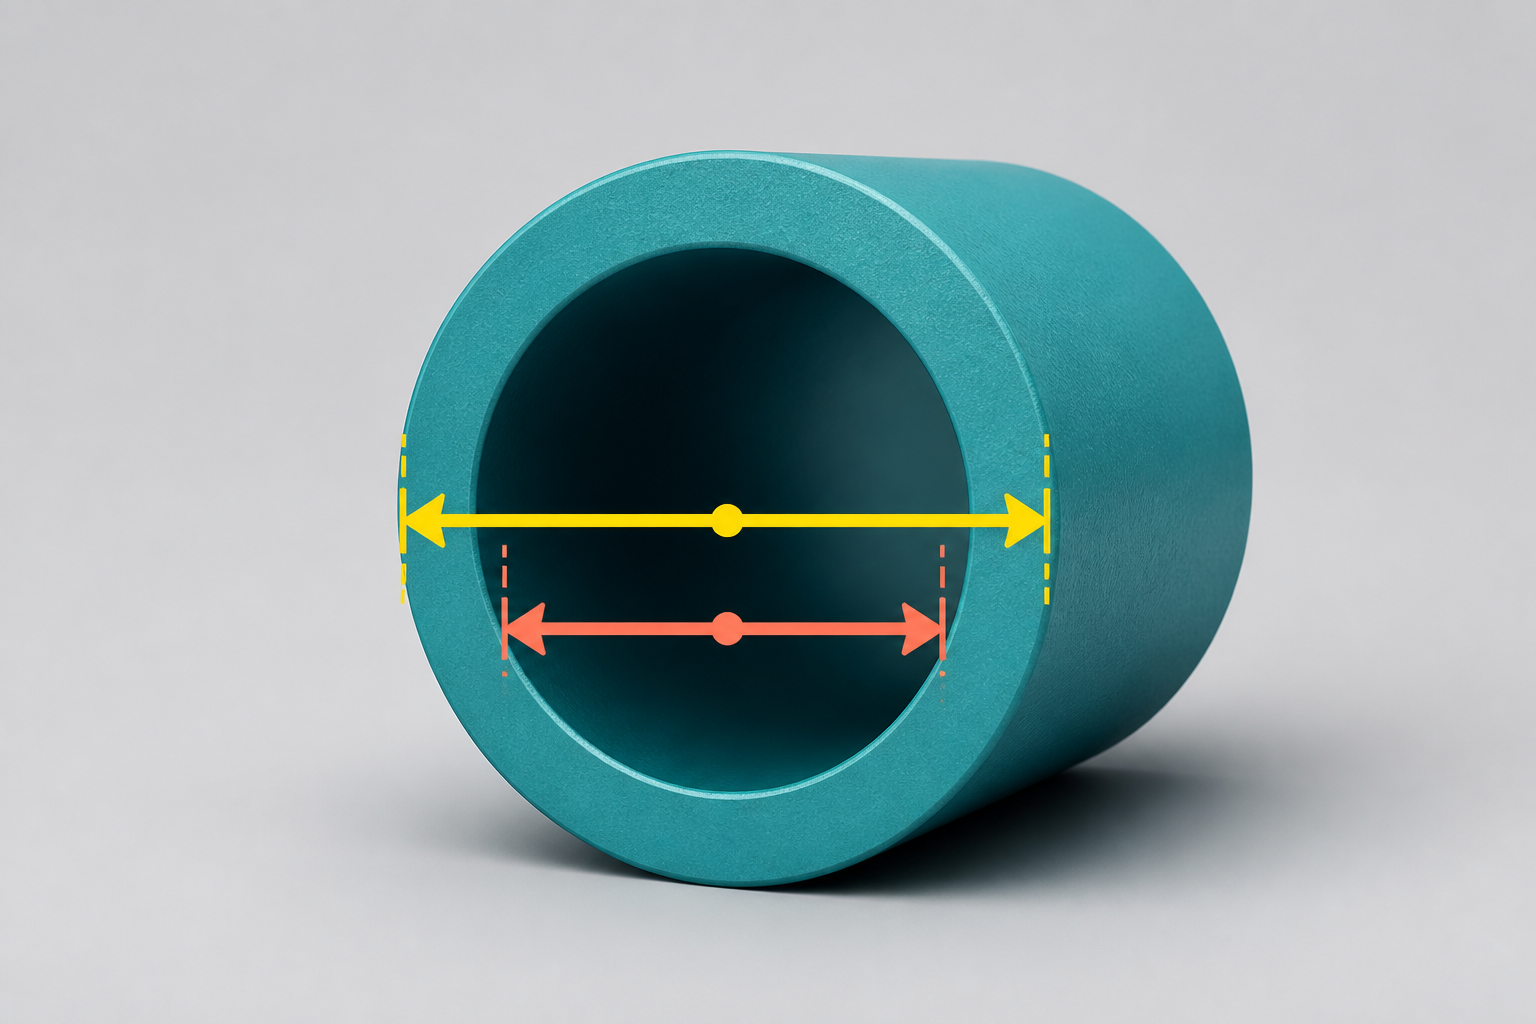
To measure OD with a caliper, place the object between the large jaws and close them gently. Rock the caliper slightly while keeping it perpendicular to the object’s axis; the correct cross-section gives the maximum outside reading. A tilted caliper can produce a diagonal reading that is too large.
To measure ID, insert the small jaws into the opening and expand them until both contact opposite internal walls. Gently rock the tool to locate the maximum reading across the true center. Avoid measuring over burrs, seams, threads, or damaged areas unless that feature is intentionally part of the specification.
Wall thickness links the two dimensions. For a uniform circular tube, approximate wall thickness is t = (OD − ID) ÷ 2. If OD is 32 mm and ID is 26 mm, the wall thickness is (32 − 26) ÷ 2 = 3 mm. Dividing by two is necessary because the material appears on both sides of the opening.
Nominal sizes require caution. A pipe sold under a familiar size label may have an actual OD or ID determined by a standard and wall schedule. Do not assume the name is a direct measurement when fitting replacement parts. Check the relevant product table or measure the real component.
Diameter Formulas and Unit Rules
The direct formula you choose depends on the information available. Keep all measurements in compatible units before calculating, and round only at the end.
| Known quantity | Formula for diameter | Use it when |
|---|---|---|
| Radius r | d = 2r | You know the center-to-edge distance |
| Circumference C | d = C ÷ π | You can measure around the object |
| Area A | d = 2√(A ÷ π) | You know the area of a circular face |
| Outside and inside diameter | t = (OD − ID) ÷ 2 | You need uniform wall thickness |
OpenStax gives the circumference relationship as C = πd or equivalently C = 2πr. The same source explains that the ratio C ÷ d is π for every ideal circle. Because π is irrational, most decimal answers are approximations. Use the π key on a calculator and round the final result to the precision the problem requests.
Diameter is a length, so use linear units: millimetres, centimetres, metres, inches, or feet. The NIST SI length guidance uses the metre as the SI base unit and common decimal subdivisions such as centimetres and millimetres. Useful exact relationships include 10 mm = 1 cm, 100 cm = 1 m, and 25.4 mm = 1 in.
Unit conversion should normally happen before you combine measurements. If a radius is 2.5 inches but the requested diameter is in millimetres, first find d = 5 inches, then multiply by 25.4 to get 127 mm. Because 25.4 mm per inch is an exact conversion, the uncertainty comes from the original measurement, not the conversion factor.
Do not attach square units to a diameter. A diameter of 20 cm is a one-dimensional length. Its circle’s area may be measured in cm², but the diameter remains cm.
Worked Examples
Example 1: Finding diameter from radius
A circular badge has radius 4.5 cm. Since d = 2r, substitute 4.5 cm:
d = 2 × 4.5 cm = 9 cm.
The 4.5 cm radius covers only half the badge. Doubling it produces the full edge-to-edge distance through the center.
Example 2: Finding diameter from circumference
A round container measures 78.5 cm around. Use d = C ÷ π:
d = 78.5 ÷ π ≈ 24.99 cm.
A sensible reported diameter is approximately 25.0 cm. If the circumference was measured only to the nearest centimetre, reporting 24.987326 cm would imply unrealistic precision.
Example 3: Finding diameter from area
A circular mat has area 1.131 m². Start with A = πr², solve for radius, then double:
r = √(1.131 ÷ π) ≈ 0.600 m
d = 2r ≈ 1.200 m.
The mat’s diameter is approximately 1.20 m. The intermediate square root is necessary because area grows with the square of the radius.
Example 4: Measuring a lid whose center is not marked
You place a ruler across a lid and obtain readings of 17.1 cm, 17.8 cm, 18.0 cm, 17.9 cm, and 17.3 cm as you slide it across. The maximum stable value is 18.0 cm, so that is the best ruler estimate of the diameter. The smaller readings are chords that miss the center.
Example 5: Pipe wall thickness
A tube’s outside diameter is 40.2 mm and its inside diameter is 34.0 mm. Assuming a centered opening and uniform wall:
t = (40.2 − 34.0) ÷ 2 = 3.1 mm.
The difference of 6.2 mm includes material on both sides, so each wall is approximately 3.1 mm thick.
Example 6: Converting inches to millimetres
A circular part has diameter 2.75 in. Multiply by the exact conversion 25.4 mm per inch:
2.75 × 25.4 = 69.85 mm.
If the original dimension is stated to the nearest hundredth of an inch, 69.85 mm is an appropriate converted value for ordinary use.
Which Tool Should You Use?
Choose a tool whose range is larger than the diameter and whose smallest readable division is appropriate for the decision you need to make. Measuring a pizza for a serving estimate does not require the same precision as checking a shaft for a bearing.
| Tool or method | Best for | Typical advantage | Main limitation |
|---|---|---|---|
| Ruler | Coins, lids, drawings, flat circles | Fast and widely available | Center and alignment must be estimated |
| Flexible tape | Pots, trunks, tanks, large cylinders | Reaches around large objects | Requires division by π and a level wrap |
| String plus ruler | Rough household estimates | Works without specialist tools | String can stretch or add thickness |
| Digital or vernier caliper | Small parts, holes, pipes, hardware | Measures OD and ID directly | Limited range and technique-sensitive |
| Micrometer | Small outside diameters needing higher precision | Fine resolution and controlled contact | Usually measures a narrower range |
| Two straight edges | Balls and bulky round objects | No center mark required | Edges must stay parallel |
A digital display does not automatically make a measurement accurate. Alignment, contact force, zero error, cleanliness, surface shape, and temperature can matter more than the number of digits shown. Repeat the measurement at least two or three times and investigate results that do not agree.
For replacement parts, compare your tool’s resolution with the allowable tolerance. If a part must fit within ±0.02 mm, an ordinary school ruler is unsuitable. If you simply need to know whether a table is about 90 cm wide, a tape measure is entirely adequate.
Common Diameter Measurement Mistakes
1. Measuring a chord instead of the diameter
A line across the circle is not automatically a diameter. It must pass through the center. Search for the maximum edge-to-edge reading or construct the center.
2. Doubling an already-given diameter
The rule d = 2r applies only when the starting value is a radius. If the question already gives diameter, do not double it again.
3. Using the ruler’s end instead of its zero mark
The scale may not begin at the physical end. Align with zero, or subtract a nonzero starting reading from the final reading.
4. Reading from an angle
Parallax shifts the apparent alignment. Position your eye directly above the measurement line or directly in front of the scale.
5. Tilting a caliper
A caliper tilted across a cylindrical part can read a diagonal rather than the true diameter. Keep it square to the axis and take repeated readings.
6. Squeezing soft material
Too much force compresses rubber, foam, thin plastic, or soft tubing. Use gentle, repeatable contact and state the method when precision matters.
7. Mixing inside and outside diameter
A pipe’s opening is smaller than its exterior. Confirm whether a specification, replacement fitting, or formula requires ID or OD.
8. Wrapping circumference tape diagonally
A diagonal path is longer than a level cross-section. Keep the tape in one plane and perpendicular to the object’s axis.
9. Mixing units
Do not combine centimetres and inches in one formula without converting. Write the unit beside every measured value before calculating.
10. Reporting false precision
A rough string measurement does not support hundredths of a millimetre. Match the number of reported digits to the tool and conditions.
Accuracy, Irregular Shapes, and Other Important Considerations
Real objects are not always perfect circles. A flexible hose may flatten, a wooden disc may be slightly oval, a wheel may be worn, and a pipe opening may be out of round. Measure at several angles. If the values differ, report the minimum and maximum diameters or an average only when that summary suits the purpose.
Round objects can also taper. A cup may have a larger diameter at the rim than at the base. A tree trunk changes width with height. A cone has many circular cross-sections, each with a different diameter. State the exact location of the measurement, such as “outside diameter at the top rim” or “diameter 20 mm from the end.”
Surface features affect contact. Paint, rust, burrs, threads, seams, bark, padding, and dirt can change the reading. Decide whether you need the overall functional envelope or the underlying material dimension. For example, the diameter over screw-thread crests is different from a thread’s pitch diameter, which requires specialist methods.
Temperature matters in precision work because materials expand and contract. NIST’s length-traceability guidance identifies thermal expansion as an important source of uncertainty in high-accuracy length measurement. This effect is negligible for many school tasks, but it matters when measuring tight-tolerance metal parts.
A rotating object must be stopped and made safe before physical measurement. Do not place a ruler, tape, or caliper against a moving fan, wheel, pulley, drill, or machine shaft. Use manufacturer documentation or a suitable non-contact method when direct access is unsafe.
For spheres, the two-straight-edge or large-caliper method is usually more reliable than balancing a ruler over the visible top. Perspective can make a photographed circle appear oval; if measuring from an image, the camera should face the circle squarely and the photo must include a reference scale in the same plane.
Finally, distinguish an exact mathematical result from an experimental measurement. If r = 6 cm is given exactly in a textbook problem, d = 12 cm follows exactly. If you physically measure r as approximately 6 cm, the calculated diameter is also approximate.
A Practical Diameter-Measuring Checklist
- Define the target: Do you need outside diameter, inside diameter, or a nominal product size?
- Choose the cross-section: Decide exactly where on the object the measurement belongs.
- Select a suitable tool: Check range, scale divisions, access, and required precision.
- Inspect and zero the tool: Clean contact surfaces and verify the starting reading.
- Align through the center: Search for the maximum width and avoid a diagonal path.
- Use gentle contact: Do not deform the object or force the instrument.
- Repeat at different angles: Confirm circularity and identify inconsistent results.
- Record value, unit, and method: For example, “OD = 32.4 mm by digital caliper.”
- Calculate only if needed: Use d = 2r or d = C ÷ π and keep full precision until the final step.
- Round honestly: Match the result to the quality of the original measurement.
For homework, draw a small circle diagram and label d, r, and C before substituting numbers. For practical work, take a photo or note of the measurement location if another person may need to reproduce your result.
Frequently Asked Questions
Is diameter the same as width?
For a perfect circle, its width through the center is the diameter, regardless of direction. For a noncircular or irregular object, “width” depends on orientation and is not necessarily a diameter.
Is the diameter twice the radius?
Yes. A diameter contains two radii placed end to end through the center, so d = 2r and r = d ÷ 2.
Does every line across a circle count as a diameter?
No. A segment joining two points on the circle is a chord. It becomes a diameter only when it passes through the center.
How do I measure diameter if I cannot find the center?
Slide a ruler across the object and use the largest edge-to-edge reading, place the object between two parallel straight edges, or measure circumference and divide by π.
How do I calculate diameter from circumference?
Use d = C ÷ π. A circumference of 62.8 cm gives d ≈ 62.8 ÷ π ≈ 19.99 cm, or about 20.0 cm.
How do I calculate diameter from area?
Use d = 2√(A ÷ π). First divide the area by π, take the square root to find radius, and double the result.
What is the best tool for measuring a coin?
A ruler is sufficient for a rough classroom reading. A digital or vernier caliper is better when you need the coin’s diameter to a fraction of a millimetre.
Can I use string to measure diameter?
Use string to measure circumference, then divide by π. Thin non-stretch string gives a better result than thick or elastic material.
How do I measure the diameter of a ball?
Place the ball between two parallel flat surfaces and measure the perpendicular distance between them, or use a large outside caliper. Do not rely on a ruler balanced over the top.
How do I measure a pipe’s diameter?
Use a caliper’s outside jaws for OD and inside jaws for ID. State which dimension you measured because pipe size labels may be nominal rather than equal to the actual diameter.
What does the symbol ⌀ mean?
The symbol ⌀ placed before a number indicates diameter on many technical drawings. “⌀ 12 mm” means a circular feature with 12 mm diameter.
Should diameter be written in square units?
No. Diameter is a length, so use linear units such as mm, cm, m, in, or ft. Square units belong to area.
Why do I get different diameters at different angles?
The object may be oval, worn, compressed, tilted, tapered, or measured at different cross-sections. Repeat carefully and record minimum and maximum values if the variation remains.
How accurate is diameter calculated from circumference?
It can be very useful, but the accuracy depends on how level, snug, thin, and non-stretching the tape or string is. Any circumference error is divided by π when converted to diameter.
Is diameter always the longest chord?
Yes, in a circle. A chord reaches its maximum length when it passes through the center; that chord is the diameter.
How This Guide Was Checked
RevisionTown reviewed the circle definitions and formulas against OpenStax mathematics textbooks. Measurement-unit guidance was checked against the U.S. National Institute of Standards and Technology. Practical caliper considerations were cross-checked with guidance from the UK National Physical Laboratory and measurement-tool documentation from Mitutoyo. Worked examples were recalculated independently, and the generated visuals were reviewed for correct centerlines, tool placement, and inside-versus-outside geometry.
Sources
About This Guide
Written by: RevisionTown Team. Reviewed by: RevisionTown Team. This beginner guide is educational and uses general measurement methods. For safety-critical, regulated, medical, or tight-tolerance manufacturing work, follow the applicable specification and use calibrated equipment.
Continue Learning About Circles
Measure Once, Then Check the Center
Diameter is simple once you remember one condition: the measurement must pass through the center. Use the widest straight edge-to-edge distance, choose a tool that fits the required precision, and repeat the reading before relying on it. If direct measurement is awkward, measure circumference and divide by π.
Ready to check a result? Enter a radius, circumference, area, or diameter in the RevisionTown Circle Calculator and compare the connected circle measurements step by step.